
Twitch
Need a hand? Setting up developer credentials can sometimes feel a bit overwhelming. We offer a complimentary 15-minute onboarding session to help you get this configured perfectly. Book your session with a specialist here
When you first install Bread & Butter, the Twitch 1-click connection may not display your own branding during the connection process if it is not fully configured for your domain.
To maximize user trust and prevent conversion drop-off, you must set up an application in the Twitch Developer console. This allows you to generate your own credentials so your audience sees your brand when they click "Continue with Twitch."
Here is how to set it up in four steps.
Step 1: Create Your Twitch App
- Log in to the Twitch Developer Console.
- Click Register Your Application.
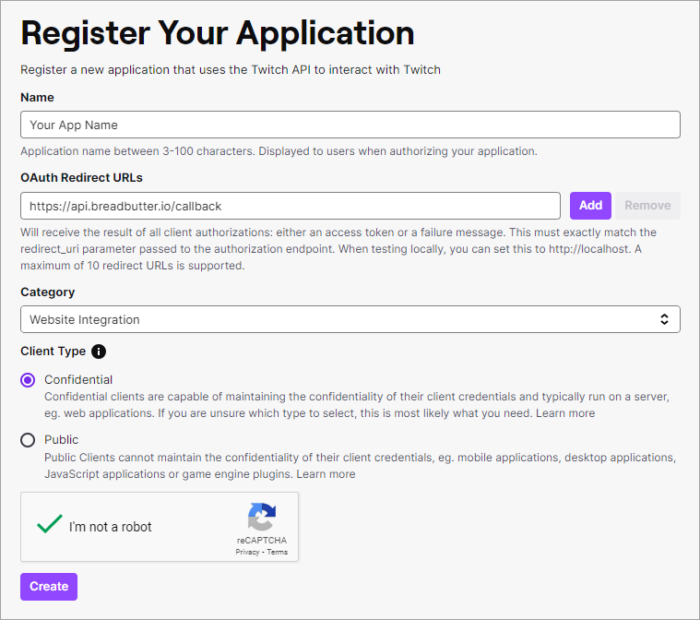
Step 2: Configure Your Application Details
This ensures Twitch correctly routes your users back to your website after they authenticate.
- Enter an App Name. We highly recommend using your exact organization or company name, as this is what will appear to users during the login process.
- For the OAuth Redirect URL, paste the following exact link:
https://api.breadbutter.io/callback - For the Category, select Website Integration (or choose any category that best describes your specific setup).
- Choose Confidential if that setting is correct for your application type.
-
Complete the reCAPTCHA security check, then click Create.

Step 3: Generate Your App Credentials
- After your App is successfully created, click Manage.
- Locate your Client ID and Client Secret.
⚠️ Important: Copy and save both of these values immediately. You will need them to connect Bread & Butter in the final step.
Step 4: Link Your Credentials to Bread & Butter
- Log in to your Bread & Butter dashboard.
- Go to Settings in the left menu, then navigate to your Global Conversion Methods tab.
- Locate your Twitch connection and edit the settings to switch from Sandbox to Production Mode.
- Enter a custom name and description for your reference.
- Paste the Client ID and Client Secret you generated in the Twitch Developer Console.
- Click Save, and ensure the checkbox next to your new Twitch provider is enabled.
Final Polish: Complete Your White-Label Setup
You have successfully added your brand name to the Google consent screen! However, visitors may still see breadbutter.io listed in the URL routing during the connection process.
To completely remove our branding and keep visitors fully within your own domain ecosystem, navigate to the Custom Auth Domain tab in your Bread & Butter settings to set up your Custom Auth Domain.
- For more information, see: What is a Custom Auth Domain, and how do I set it up?