
Apple
Need a hand? Setting up developer credentials can sometimes feel a bit overwhelming. We offer a complimentary 15-minute onboarding session to help you get this configured perfectly. Book your session with a specialist here
When you first install Bread & Butter, the Apple 1-click connection is pre-configured in Sandbox Mode. To maximize user trust and maintain full brand consistency, you must transition Apple out of the sandbox by generating your own custom credentials within your Apple Developer account.
Here is how to set it up in four steps. (Note: You must be officially enrolled in the Apple Developer Program to complete this setup).
Step 1: Create Your App ID
First, you must register your website as a recognized App within the Apple ecosystem.
- Log in to your Apple Developer account.
- https://developer.apple.com/
- If you are not part of the Apple Developer Program, follow Apple's guide to enrolment https://developer.apple.com/support/app-account/.
-
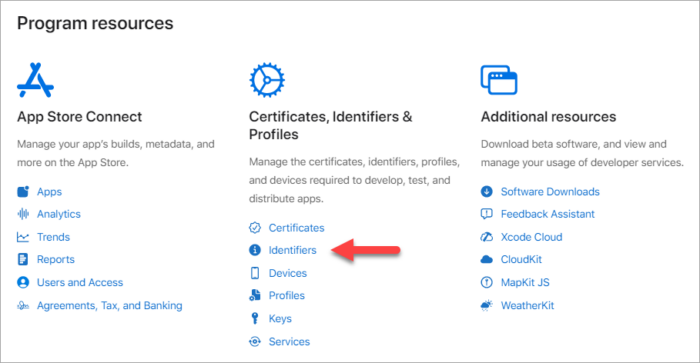
Click on Account in the top right menu, then under Certificates, IDs & Profiles, click on Identifiers.
- Click the blue + button to add a new identifier.
-
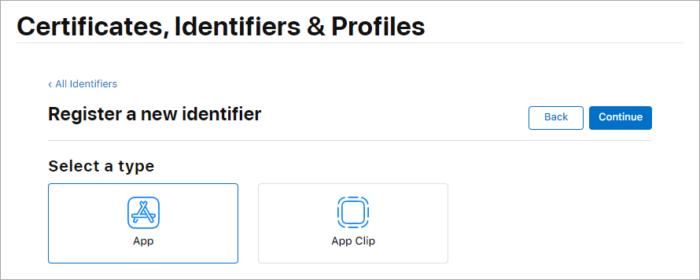
Select App IDs and click Continue. For the type, select App and click Continue again.
- For the Description, enter your organization's name.
- For the Bundle ID, enter a reverse-domain style string (e.g.,
com.yourdomainname).


⚠️ Important: Copy and store the Team ID displayed on this page. You will need it for the final setup step.
-
Scroll down to the Capabilities list and check the box for Sign in with Apple.

- Click Continue at the top of the page, confirm your information, and click Register.

Step 2: Create & Configure Your Services ID
This dictates the exact URLs Apple is allowed to redirect your users to after they connect.
-
Back on the Identifiers page, use the dropdown menu on the right to switch from App IDs to Services IDs.
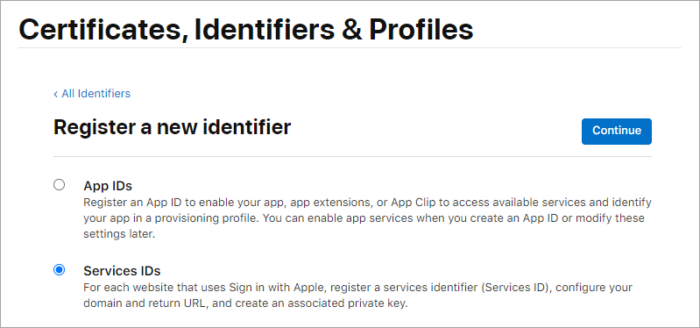
- Click the blue + button to add a new identifier, select Services ID, and click Continue.
-
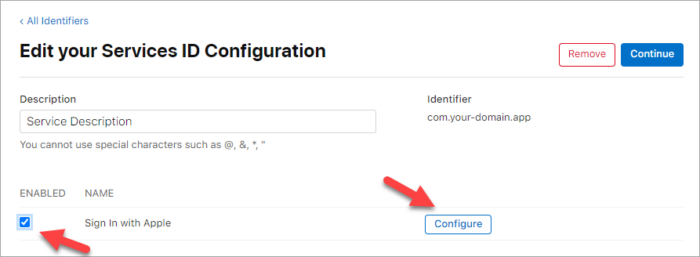
Add a Description and an Identifier value.
(Note: This Identifier must be different than the Bundle ID you created in Step 1. We recommend simply adding
.appto the end of it).⚠️ Important: Copy and store this new Identifier value. This will act as your "Application (client) ID" in the final step.
- Click Continue, confirm the info, and click Register.
- Now, click on the new Service ID you just created. Check the box for Sign in with Apple, and click the Configure button beside it.
- Ensure the App ID you created in Step 1 is selected as the Primary App ID.
- Under Domains and Subdomains, enter:
api.breadbutter.io - Under Return URLs, enter:
https://api.breadbutter.io/callback - Click Next, confirm the configuration, click Done
- On the Services ID page, click Continue, and then click Save.

Step 3: Generate Your Security Key
- In the left menu, select Keys. Click the blue + button to add a new key.
-
Give it a name, check the box for Sign in with Apple, and click Configure.
- Select your Primary App ID, click Save, then click Continue and Register.
- Copy and store your Key ID.
- Finally, click to Download your Key. (Warning: Apple only allows you to download this key file once. Keep it safe!)

Step 4: Link Your Credentials to Bread & Butter
- Log in to your Bread & Butter dashboard.
- Go to Settings in the left menu, then navigate to your Global Conversion Methods tab.
- Locate your Apple connection and edit the settings to switch from Sandbox to Production Mode.
- Enter a custom name and description for your reference.
- Paste your Key ID (from Step 3).
- Paste your Application (client) ID (This is the Services Identifier from Step 2).
- Paste your Team ID (from Step 1).
- Open the downloaded Key file in a basic text editor, copy the contents, and paste it into the Key field. (Important: Do NOT include the
BEGINorENDtags in the text you paste). - Click Save, and ensure the checkbox next to your new Apple provider is enabled.
Final Polish: Complete Your White-Label Setup
You have successfully added your brand name to the Google consent screen! However, visitors may still see breadbutter.io listed in the URL routing during the connection process.
To completely remove our branding and keep visitors fully within your own domain ecosystem, navigate to the Custom Auth Domain tab in your Bread & Butter settings to set up your Custom Auth Domain.
- For more information, see: What is a Custom Auth Domain, and how do I set it up?